

Wi-Fi is the most common way to connect to the internet now. It became popular quickly since it is wireless, and multiple devices can use the same Wi-Fi network at the same time. In this article, we will discuss how to see Wi-Fi passwords on Windows 10.
Almost all the Wi-Fi networks are password-protected, which means you will need to enter a password to connect to the network. Once you connect to a Wi-Fi network, most devices save the password for that network and you will not need to enter it again and again, every time you connect to the same network. So it’s common for most people to forget their Wi-Fi password. So when they need to connect a new device to their Wi-Fi network they are in trouble. Most of the time what people do in these cases is resetting the router so they can use the default password given to the router by the manufacturer. So this article aims to save you that trouble and to explain to you step by step how to see your Wi-Fi password on Windows 10.
How to View Saved Wi-Fi Passwords in Windows 10
To get started, you need to first connect to the Wi-Fi network. Otherwise, this will not work.
Note: To see the Wi-Fi password on windows, you should be logged into Windows from an administrator account. If you are logged in from a standard account these methods may not work.
Step 1. Open Windows network and sharing center
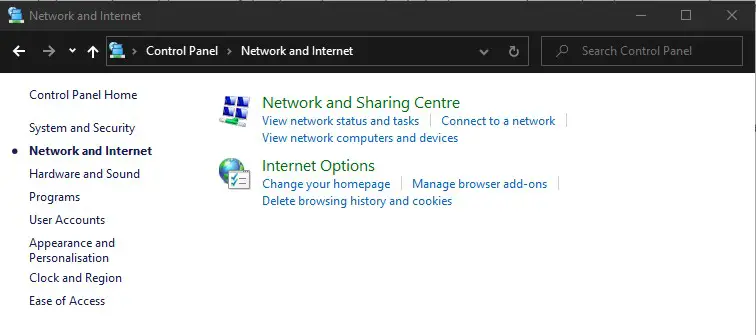
To see your Wi-Fi network password you need to go to the network sharing center on windows 10. There are several ways to do this.
Method 1: via the control panel
- Open control panel. You can click on the windows icon on the start menu and type ‘control panel’ to find it and open it.
- Click on the network and the internet.
- Click on the network and sharing center.
Method 2: via File explorer
- Open file explorer. File explorer is opened when you go to any folder in windows 10.
- On the left side menu, scroll down to the bottom and find the ‘Network’ icon which shows in blue. Then click on it.
- Once you are inside the network folder, select ‘network’ from the top menu bar. There you can see the network sharing center. Click on it.
Method 3: via Wi-Fi settings
- Open Wi-Fi settings. Click on the start menu and type Wi-Fi settings to find Wi-Fi settings.
- In Wi-Fi settings, under ‘related settings’ you can find ‘network and sharing center’.
- Click on it to open.
Method 4: via the Wi-Fi icon
- On the system tray (the place where the time is shown) click on the Wi-Fi icon.
- Click Network and internet settings.
- Scroll down to go find the network and sharing center and click on it.

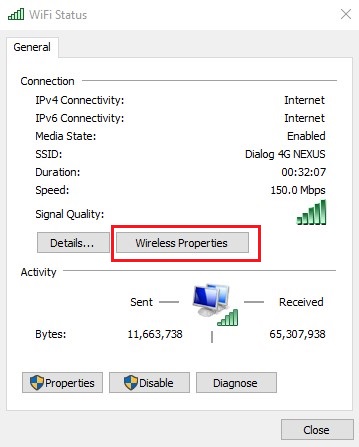
Step 2. Open Wi-Fi status
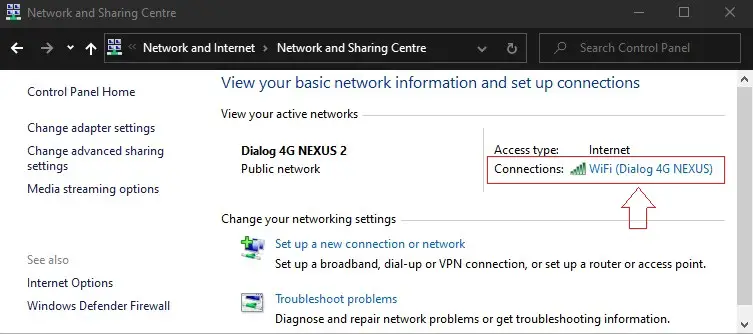
Once you open the network and sharing center now you can see all the details of the networks you are connected to under the ‘view your active networks’ section. To open Wi-Fi status,
- Find the Wi-Fi network you are connected to.
- Under connections, you should see the network name of your Wi-Fi network in blue color.
- Click on it to open Wi-Fi status.
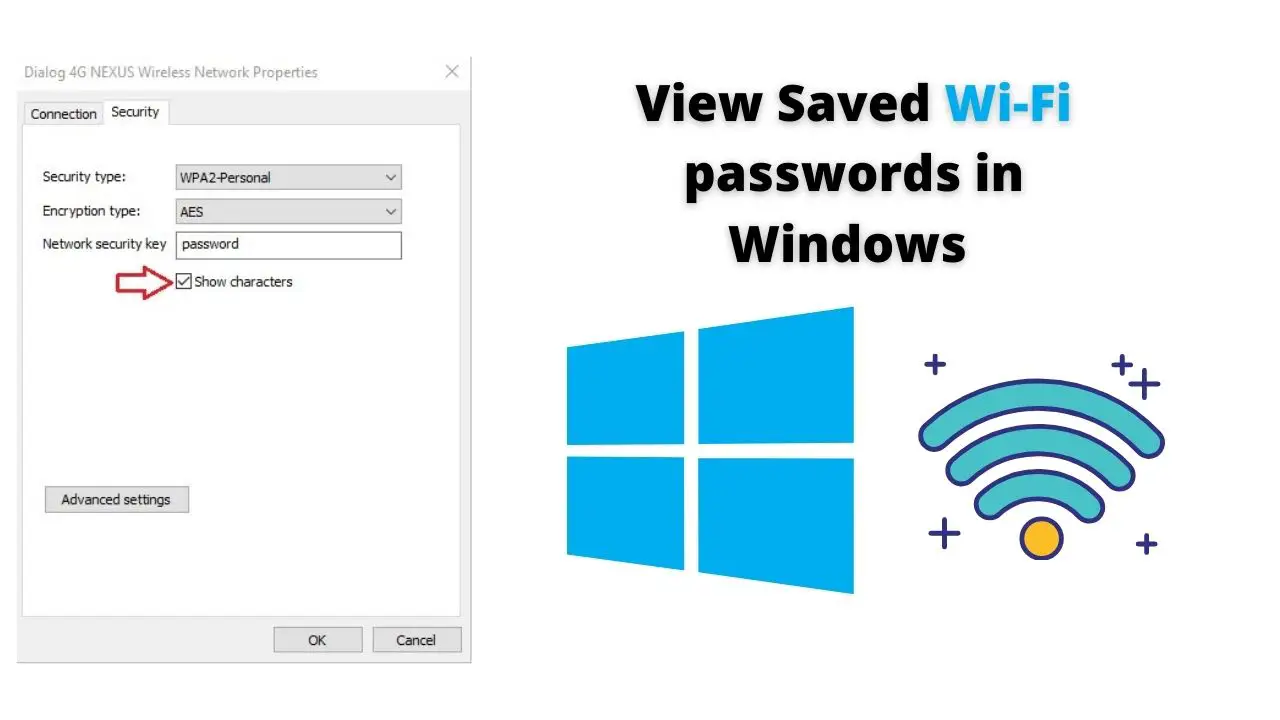
Step 3. Open wireless properties and see the password
Once you open the Wi-Fi –status, you should see details about your Wi-Fi network there.
1. Under the connections section, click on Wireless Properties.
2. Click on the Security tab.
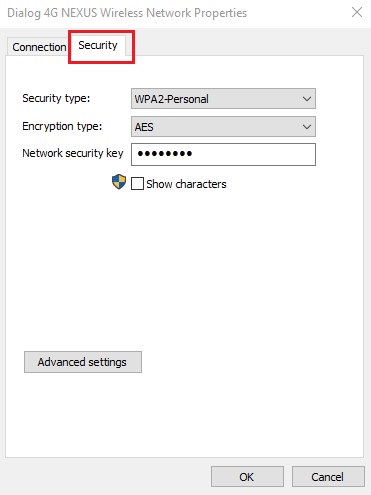
3. Under the network security key, there is a checkbox that says, ‘Show characters‘ click on it to reveal the password.
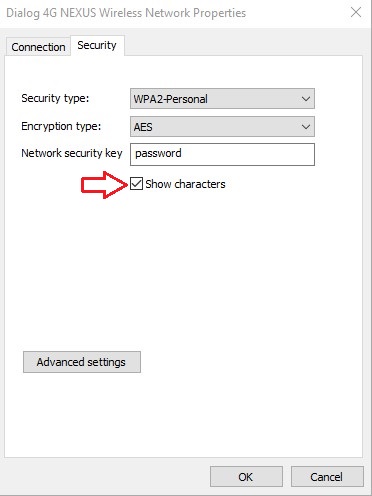
Mind that If you are on a guest account on Windows 10, this option might ask you to enter the admin password.
View Saved Wi-Fi Password on Windows 10 using Command Prompt
You can always use the command prompt to see the Wi-Fi password on Windows 10. You can use the command prompt to see the Wi-Fi password on any windows operating system. This is a bit more complicated than the previous method but still, this works fine. Make sure you follow these steps one by one correctly to get the Wi-Fi password.
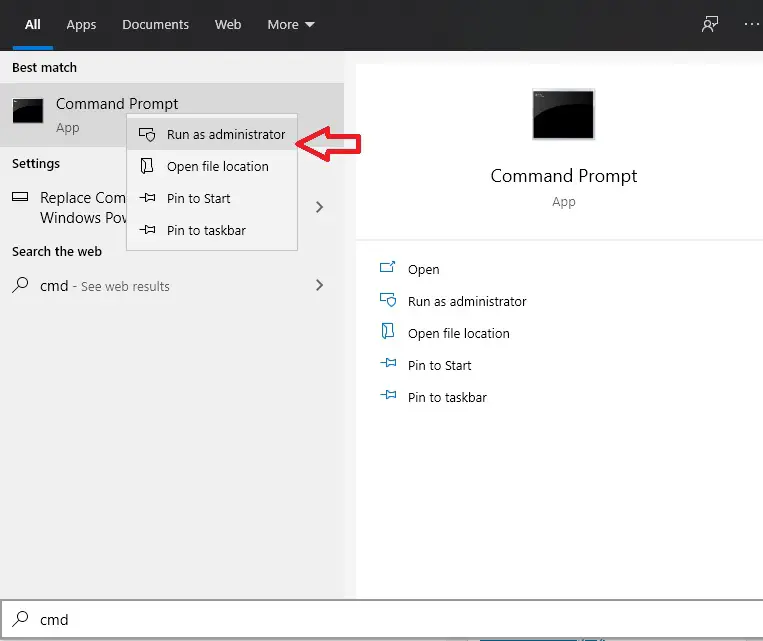
First open command prompt. To do this click on the start menu and type ‘cmd’. Right-click on the command prompt and click ‘Run as administrator’
Now you will have to enter the following commands one by one on the command line.
NETSH WLAN SHOW PROFILE
After entering this command press enter. This command will list down all the Wi-Fi connections that are saved on your computer. Now see if the Wi-Fi network you are connected to is available on this list. Now remember the network name as it is on this list and enter the second command.
When entering the following command replace the word ‘network name’ with the name of your network.
NETSH WLAN SHOW PROFILE NETWORK NAME KEY=CLEAR
This command will show all the properties of the network. there will be a lot of information. Scroll down to Security settings and under the ‘key content’ section you can see the Wi-Fi network password.
How to View Wi-Fi Password on Windows 7 and 8
If you are using older versions of Windows, such as Windows 8 or 7 the steps are slightly different than it’s on Windows 10. We will now briefly explain those steps on Windows 7 and 8.
Windows 8
- Open the network and sharing center by right-clicking the Wi-Fi icon on the system tray. Or you can try out the methods mentioned in the above section in this article.
- Go to change adapter settings.
- Now right-click on Wi-Fi on adapter settings and click on status.
- Now Wi-Fi status dialog will open. Click on wireless properties in general.
- Under security, you will see the Network security key, check ‘Show characters’ to see the password.
Windows 8.1 also follows similar steps.
Windows 7
In Windows 7 follow the same steps as for Windows 8, go to network and sharing center, and then change adapter settings. From the Wi-Fi status dialog, you will be able to see the Wi-Fi password.
As said before, you can always find the password of the Wi-Fi network using a command prompt. The command prompt method even works on older versions like Windows XP.
Also Read: How to View Saved Wi-Fi Password on Android Without Root