Zoom has become the essential working app for almost every company and institute. Everybody loves Zoom and everybody uses it in day-to-day life. Zoom became popular over other video conferencing apps within a short time because it is easy to use and it has many features. In this article, we hope to discuss one such feature. We will discuss how to do a breakout room in zoom.
What are breakout rooms and how do they function?
Breakout rooms in zoom take you to the next level of video conferencing. Breakout rooms split zoom meetings into several smaller sessions. By now you can split one meeting into 50 different sessions. Each session has different participants, which could be assigned manually or automatically. Also, you can allow participants to choose for which session they enter. After creating breakout rooms the host and the co-hosts can switch between rooms and interact with the room participants separately. This makes meetings much more dynamic and gives an in-person meeting experience to the users. The host can interact with one set of participants at a time when there are lots of participants in a meeting.
Now when rooms are created these rooms can be configured using many options. You can configure to assign every participant to a room or let participants decide if they get into a room. Also, you can configure if a room ends after a certain period and if you let participants leave the room without leaving the meeting. So when breakout rooms are created, the main meeting is running and rooms are run separately. Depending on the options you configure, participants will either enter rooms or stay in the main session.
Requirements to host a meeting with breakout rooms
- Breakout rooms enabled in your zoom account
- Zoom desktop or web client
To get the full functionality of the breakout rooms, the host must use a Desktop client.
How to enable Breakout rooms in your zoom account.
As we said before, with Zoom you can create 50 separate sessions using breakout rooms. Before creating breakout rooms you have to enable breakout rooms in your zoom account. To enable the breakout rooms feature in zoom meetings, follow the steps given below.
1. Go to zoom.us and sign in to your zoom account.
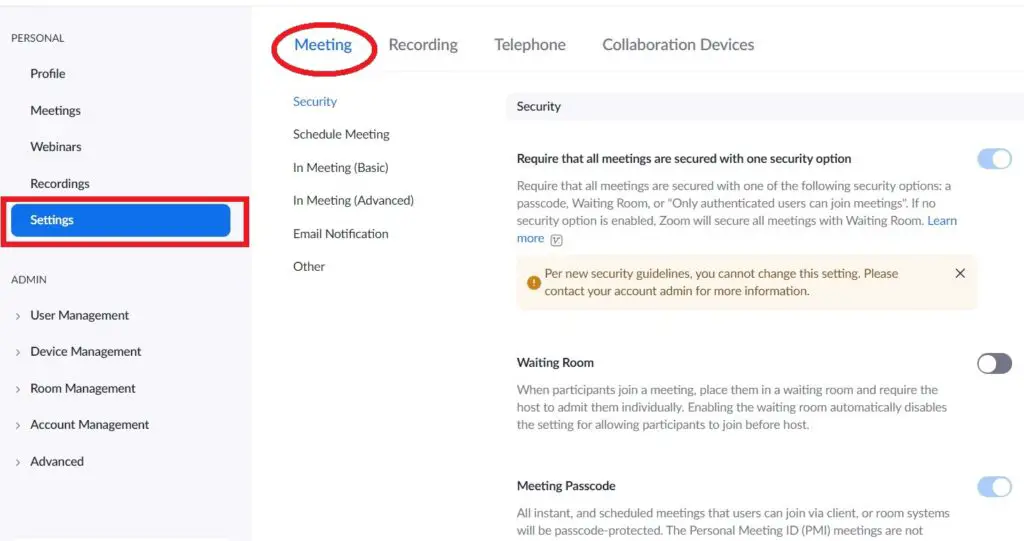
2. On the left side of the screen under “Personal “ tab you should see settings. Click on it to open settings
3. Now open “Meetings” tab.

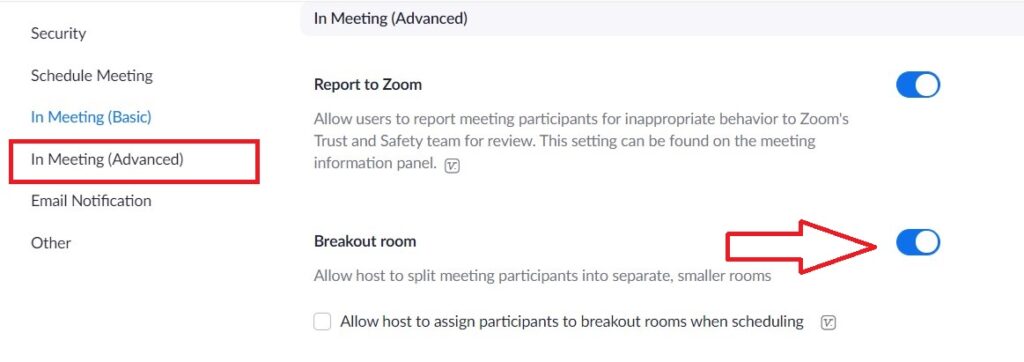
4. Scroll down to “in meeting(advanced) “ section
5. Switch on “breakout room” option.

Now there is another option that says “allow host to assign participants to breakout rooms when scheduling” check that button to create breakout rooms when scheduling.
Now you can create breakout rooms when you are scheduling a meeting or hosting a meeting using the Zoom app.
Also Read: Quick Guide on How to Change Zoom Background on Android
How to create breakout rooms using the Zoom app
Now after enabling the breakout rooms from your account you are able to create breakout rooms from your zoom app when you schedule a meeting or when you host a meeting. Follow the steps below to do it.
To create a breakout room after starting a meeting,
- Start the meeting
- Click on the “Breakout rooms” icon on the bottom
- Now you can define the number of rooms which you want to create. Now the options for assigning participants to these rooms are “Automatically”, “Manually” and “Let participants choose room”. Select one of the options then click “create rooms”
Now your rooms will be created. But they will not start until you click on “open all rooms”. You also can configure some additional settings by clicking on the options menu. Some of the options are given below.
- Allow participants to choose room: participants will choose their own room when joining the meeting.
- Auto close breakout rooms: you can assign a time to auto close breakout rooms.
- Set countdown timer: participants will have a countdown timer until the room ends
- Allow participants to return to the main session at any time: when breakout rooms are created, participants can get out from the room and join the main session without joining any room.
- Automatically move all assigned participants into breakout rooms: this will move all the participants in the meeting to separate rooms. If you do not check this box, participants can stay in the main session without joining a room.
How to manage breakout rooms
Assign participants: you can click the “Assign” button next to the rooms and select one or multiple participants to add to that room
Managing participants: if a participant has not joined a room that participant will be shown as “not joined” in Infront of their name. You can add them to a room if you want to.
Breakout room options: in the breakout room window, you can click join, leave or close all rooms options.
Requests for help: participants can ask the host to join their room by clicking “ask for help” option in their room. Then the host will be notified with a message.
Broadcasting a message to all rooms: Host or co-host can send a message to all rooms at once. By going to “breakout room” option then clicking “Broadcast message to all” after entering the message click “Broadcast”
Like sending a message to all breakout rooms, you can also share your screen with all Breakout rooms. Follow the steps below to do that.
- In meeting controls click on “share screen”.
- Click on the “Share to breakout rooms” option
- Click the content you want to share, the entire screen or a window.
- Click on share to share the screen to all the breakout rooms.
Limitations of breakout rooms
- Zoom users who are joined from mobile devices cannot manage breakout rooms, but they can participate in breakout rooms.
- When doing a cloud record, the main session will be recorded. When doing a local record, the screen of the participant is recorded.
- The number of participants who can be assigned to rooms can be varied.
Also Read: How to Mute Zoom Audio Without Muting Computer


