In this post, you will learn how to set the time on your iPhone camera in detail. People today talk about these features because smartphones have become better at taking pictures. Editing tools, creative filters, and retouching applications may all assist in boosting the quality of any photograph you take. On the other hand, the self-timer is a simple and free tool that Instagram photographers sometimes disregard.
This easy function, which is built straight into your iPhone, may assist you in creating breathtaking photos anytime, anywhere.
- What is it about this technique that people find so appealing?
- Tips on how to use the timer on your iPhone camera
- Using the iPhone camera timer to take selfies and group photos
- What is the best way to capture many shots at the same time?
- Is it possible to utilize the shutter timer to record videos?
- Use of the iPhone Self-Timer to Reduce Blur: What to Look for?
- Wrapping Up – Set Timer on iPhone Camera
What is it about this technique that people find so appealing?
- The iPhone camera timer allows you to set up the perfect photo first and then get into the action yourself.
- Choose the ideal camera delay to allow you plenty of time to get into position before the shot begins.
Tips on how to use the timer on your iPhone camera
The procedure is straightforward. The criteria for each photographer will be different. When dealing with different scenarios, you may wish to set the timer for a few seconds in one and more in another. One advantage is that you can customize the timer countdown to your specifications. Here are the steps you should follow on iOS 15.2.
1. Unlock your iPhone and choose the Camera app from the home screen to begin shooting photos.
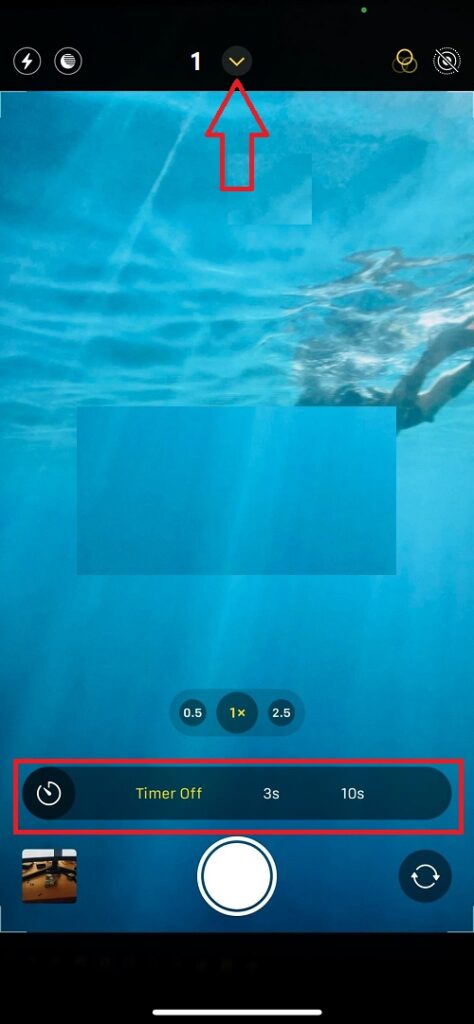
2. Place your iPhone in the spot where you want the shot to be taken and press the arrow button at the top of your screen.
3. Following the placement of your phone in the appropriate place, hit the clock symbol at the top of the screen to activate it.

4. After that, choose a countdown for the timer. You have two choices: three seconds or ten seconds.
5. To start the self-timer, press the shutter button on your camera. Tap the stop button at any moment throughout the timer’s run if you wish to end it.
Select the Photos app once you have taken your shot. Select the snapshot taken with the self-timer from your collection. Select from a choice of ten distinct burst photographs that were captured with the self-timer in this section. Click on “Done” in the top right-hand corner once you have browsed through the photographs and selected the ones you like the most.
Using the iPhone camera timer to take selfies and group photos
Even though the classic selfie has been around for some time, you often wind up with a strange-looking hand or an odd shoulder in the shot, even when using a selfie stick. A tripod and your iPod camera timer are quite useful for a more natural-looking selfie or group photo; both are inexpensive.
It is ideal to utilize the 10-second timer for selfies and group photographs since it provides you with enough time to travel to your chosen place and get yourself set. Here are some guidelines and ideas for leveraging your iPhone camera timer to take a stunning selfie or group shot with your friends:
- Pick a place to take your shot. To avoid distracting patterns, choose a space with a neutral color scheme and no obvious sources of light or shade. Because glare may ruin a photograph, it is best if the sun is to one side or behind the camera.
- If you are shooting a group portrait, you should have your family or friends pose so that you can frame the photograph. To get a real selfie, you’ll have to customize your pose.
- The tripod should be placed at or near eye level to get the best outcome when utilizing a compact iPhone tripod. By placing it on a table or other stable surface, you may quickly complete this task. To frame your shot, you may use a GorillaPod, which can be attached firmly to almost anything. This is quite important because it allows you to be more flexible with your shooting locations.
- Open up the Camera app on your iPhone. Then, tap on the clock icon to get the time.
- Select a time limit of 10 seconds and press the shutter button.
- Return to the spot you selected for your shot and strike a pose there once more.
Repeat the process until you are satisfied with the outcome.
What is the best way to capture many shots at the same time?
You can snap multiple photographs with your iPhone if you have an iPhone X or older and hold down the shutter button while shooting. On the iPhone 11 and subsequent models, drag the shutter button to the left to take a picture. These ways will instruct your phone to shoot in burst mode. And this means you’ll be able to pick among ten photographs in the Photos app when you’ve completed your shot.
Is it possible to utilize the shutter timer to record videos?
This function is only available in the Photo mode, and it doesn’t work in any other modes of the Camera app.
Use of the iPhone Self-Timer to Reduce Blur: What to Look for?
Those of you who have attempted to snap photographs in the dark with a smartphone will understand how tough it can be. A lack of sufficient light causes blurry photographs to steady in the image frame, even when utilizing the camera’s built-in night mode. On the other hand, the iPhone self-timer may help eliminate blur in your nighttime photos since you won’t be holding your phone throughout the shoot. Consequently, if you can keep your phone secure, the nighttime images you take should be as bright and clear as those taken during the daylight hours.
Thanks to the iPhone’s automatic activation of the night mode function, this is not a problem. Set up your phone and start the self-timer, and you’re done.
Wrapping Up – Set Timer on iPhone Camera
To summarize, now you know how to use the self-timer function in the iPhone camera application. With this knowledge, you’ll be able to snap as many family photographs as you like without ever feeling left out of the celebrations.


