Are you one of those who want to know how to install Windows 11 on a Mac without Boot Camp? Yes. In most cases, a computer can only execute a single operating system at a time. When utilizing Mac computers, users may find themselves needing to run two operating systems simultaneously on the same machine in some scenarios.
Since the beginning of time, Apple’s built-in Boot Camp utility has allowed Mac users to partition their hard drives and subsequently install Windows on their machines. Although this is the case, many users are still exploring alternatives to Boot Camp in order to install Windows 10 on their Macs. And this is because Boot Camp is time-consuming, error-prone, and slows down installation productivity in many situations since it does not perform flawlessly in many circumstances. Don’t be concerned. Here’s how to install Windows 11 on a Mac without Boot Camp.
Installing Windows 11 without Boot Camp on a Mac
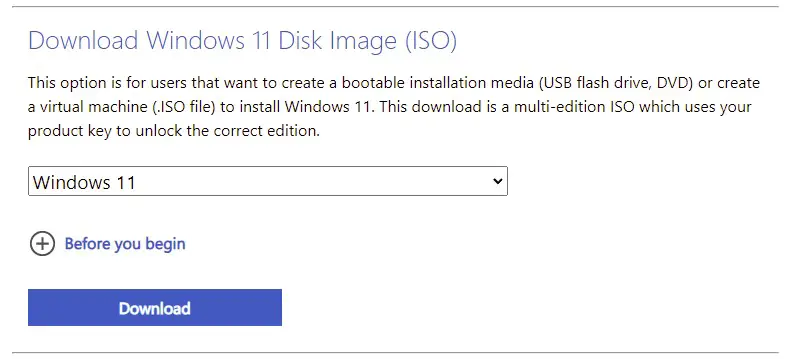
First and foremost, you have to download Windows 11. And here’s how to do it:
A Windows 11 ISO image allows you to install Windows 11 on your PC without any interruptions. ISO files are disk images that enable the creation of bootable USB flash drives and discs. Additionally, they are used to boot a virtual machine. The Microsoft website now offers the Windows 11 ISO file for download; it’s available for free download. Windows 10 customers may get a free upgrade from Microsoft if they have the genuine OS installed. In the meantime, you may bypass the product key step of the installation process when installing Windows 11 from an ISO file.
The quickest and most convenient method of obtaining the ISO file is to do it straight from the official website. For information on how to get the Windows 11 ISO file, follow these steps:
Step 1: Visit the Windows 11 ISO download page.
Step 2: Choose “Windows 11.”
Step 3: To download the file, click “Download.”
Step 4: Select your preferred language and click on the “Download” button.

Now you are ready for the Windows 11 installation process on your Mac; follow these steps:
1. Creating a Windows 11 bootable USB for the installation process
You will need to make a Windows 11 bootable USB installer to complete the installation. This requires using a flash drive, and you must follow the instructions outlined below to generate a Windows 11 USB bootable installer.
Step 1: Format Bootable USB Drive
- A Master Boot Record (MBR) Scheme and an exFAT partition should be used to format your USB bootable drive.
- Bootable USB drive formatted using Disk Utility
- Go to the Disk Utility by selecting Application > Utilities > Disk Utility
- Click on View > Show all devices
- Select the Windows USB Bootable and then click on Erase.
- Select MBR, then click on the Format menu and select exFAT
- Enter your Windows USB drive now.
- Next, click on the Erase button.
Step 2: Mount the Windows 11 ISO
To mount the Windows 11.iso image on your Mac, double-click on the file named Windows 11.iso.
Step 3: Windows 11 Bootable USB Installer creation
You may make a bootable Windows 11 USB on a Mac by using Terminal. To launch the Terminal, go to Application > Utilities > Terminal or use the macOS Spotlight search function to look for “terminal.” Create a bootable USB for Windows 11 by running this Command.
rsync-vha/Volumes/CCCOMA X64FRE EN-US DV9/*/Volumes/WIN11
2. How to Make a New Windows Partition on a Mac?
It is standard for Macs to have their internal solid-state drives (SSDs) formatted in either HFS or APFS, two common file systems supported by OS X and macOS. But NTFS and FAT are the only supported file systems for installing the Windows operating system. To accommodate the Windows operating system, you will need to create a separate partition. We propose using the MS-DOS (FAT) file system as your target file system.
Warning: Before proceeding, please make a backup of your Mac to prevent data loss.
Let’s get started with the process of creating a new partition on a Mac.
- The first step is to launch the Disk Utility app and choose the Apple SSD from the top left-hand navigation bar. Then, at the center-top of the screen, choose the Partition tab, which will bring you to the disk partition window.
- There is a circular representation of the whole disk. To add a new partition, you must click on the “+” button located under the circle. Afterward, rename the partition, specify its size, and then choose MS-DOS (FAT). The installation of Windows 11 needs at least 65 GB of free storage space. If you intend to use Windows 11 regularly in the future, we encourage you to give more.
After completing the processes mentioned above, click the “Apply” button to save the modifications. A new Windows FAT partition is generated as a result of this!
3. Boot your Mac with the Windows 11 installation media
All of the preliminary work has been completed up to this point! Now it’s time to connect the Windows 11 installation USB to your Mac. After that, reboot the Mac while pressing and holding the Option key. The EFI boot (Windows 11 Bootable USB) icon will appear in the Startup Manager. To begin installing Windows 11 on your Mac, just click on the icon.
Bypassing the TPM 2.0 Restriction on the Mac
After selecting your preferred language on the Windows 11 setup screen, click Next. The “Install Now” option will be visible to you. Please refrain from clicking on it. Instead, use the Shift + F10 key combination to launch the built-in Command Prompt application that comes pre-installed with the Windows 11 operating system. To get around the TMP 2.0 limitations on the Mac, we’ll need to perform a few registry hacks.
- In the Command Prompt window, type Regedit to launch the Registry Editor from the Windows 11 install media.
- Then, in the Registry Editor, go to the following path:
HKEY_LOCAL_MACHINE\SYSTEM\Setup
- You may right-click on the Setup folder to open it. Select New->Key from the pop-up window that appears.
- Change the key’s name to “LabConfig.” You can now right-click on the LabConfig folder icon and then choose New->DWORD (32-bit). Give this new value (BypassTPMCheck) name.
- Repeat the preceding steps to generate two extra values, which you may name BypassRAMCheck and BypassSecureBootCheck, respectively. Double-click each value and change its data to 1.
- Return to the Windows 11 installation by closing the Command Prompt utility. The errors will no longer arise at this time! As a result, you may proceed with the installation procedure by following the next steps:
- When the Windows 11 installation procedure asks for a partition, choose the one you’ve prepared for it.
- Windows 11 installation will prompt you with a series of fundamental questions, including your location, keyboard configuration, network, username, password, diagnostic information, etc. Select your settings and click “Continue.”
- You should now be able to view a completely clean Windows 11 desktop on your Mac. To be clear, don’t get your hopes up just yet. Installing the Mac drivers is required to have a smooth experience when working on Windows 11 on a Mac.
- Navigate to the “Bootcamp” folder on the bootable Windows 11 USB device to install the necessary drivers. Launch setup.exe from the Boot Camp folder and follow the on-screen instructions to complete the installation. Continue by restarting your device after the installation has been completed.
All done; congratulations.
Conclusion
The process of installing Windows 11 on a Mac requires a significant amount of time. This is because Windows 11 does not officially support the Mac. Installing Windows 11 on hardware that is not officially supported necessitates the use of extra settings. Fortunately, the approach described above will assist you in resolving this inconvenient situation.


