
DNS or Domain name system server is the server where the IP addresses of each website are stored. When you are surfing through the internet you might have encountered this term frequently and have wondered what is DNS and why it is important. In this article, we hope to discuss DNS and how to change DNS on Android smartphones and tablets.
What is DNS?
As said before, the Domain name system is the index of IP addresses and the corresponding domain names. To explain what DNS is, first we should look at how the internet works. Each website that is available on the internet is hosted on a server. All these servers have unique IP addresses. When we ‘visit’ a website what we are simply doing is accessing the server where the website is hosted via its IP address. But as we know we never type in the IP address when we want to access a website, we just type the ‘Domain name’ of the website, such as google.com. This is where DNS servers come in. DNS servers keep a record of domain names and corresponding Domain names. So when we type in the domain name our browser first connects to a DNS server then looks up the IP address which is related to that domain and access that server. The actual process is more complicated than this but this is the overall idea of what is happening in DNS servers.
DNS servers affect your internet experience more than you think. When you try to visit a website for the first time your device connects to the DNS server and finds the corresponding IP address to go to that website. So if the DNS server is slow or has issues, the website may take a long time to load or may even not load at all.
DNS Services
Most of the time when you are surfing through the web, your ISP provides a DNS. This is the DNS that your device uses to access the web. The ISP which is provided by your ISP may not be fast or efficient, Or that DNS might block even some websites. So it’s always better to change the DNS from the default DNS.
There are many DNS services on the internet. When you choose a DNS service check out the security and the efficiency given by the DNS Server. Most of your web requests would be directed to this DNS server so you have to choose a secure DNS server for you to use.
Google public DNS provided by Google is one of the most trusted custom DNS you can use. The DNS servers at google are very fast are updating frequently. So you can get a better browsing experience with Google public DNS. It also supports DNS over HTTPS and DNS over TLS so all the web requests you make from your browser are exchanged through secure routes.
Another alternative DNS service is CloudFlare 1.1.1.1. Studies suggest that this DNS service is even faster than the google public DNS. It even has an app that can be used on android.
You can even use DNS to filter out specific websites and website categories. As an example, OpenDNS identifies and restricts adult website categories. So if a child is using a phone you can configure OpenDNS so they cannot access many of the popular adult websites.
How to Change the DNS server in Android?
The steps to change the DNS server in the android device are a bit specific to the android version you are using, In newer versions, all the settings are well categorized and easy to manage but in older versions, you will have to do a bit of digging to find the relevant setting but we will try to give you some general steps.
Most of the time DNS server could only be changed for wifi networks. For mobile Data connections, you will have to use the DNS server provided by the mobile network provider.
Note: to check your android version and build, go to settings, and about the phone. The android version is mentioned there.
Setting DNS for Android 9 and newer versions.
In previous Android versions, you would have to setup DNS for each network if you are changing the DNS, but after android version 9, now you can set one DNS for all the networks to use.
- Go to Settings.
- Go to Connections.
- Find the setting ‘Private DNS’.
- Now select the option ‘Provide DNS hostname’ then give the hostname of the DNS.
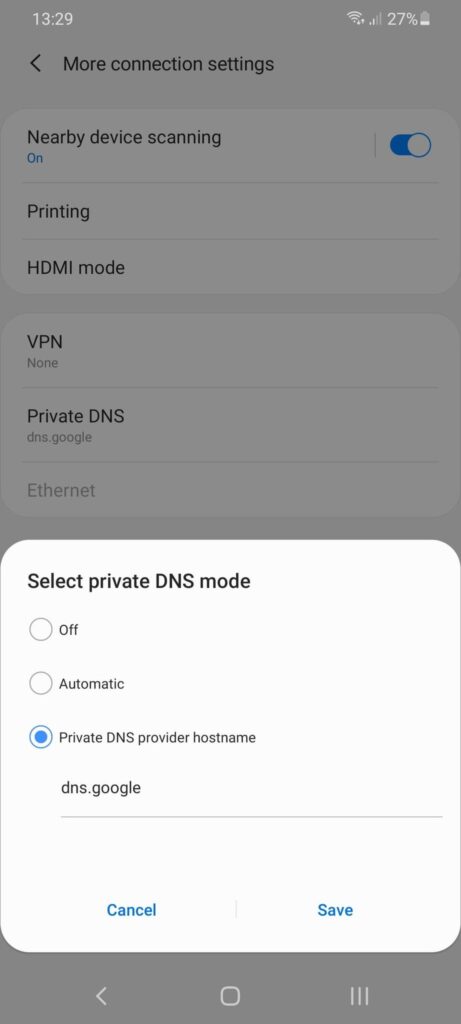
Now you will have to type in the hostname of the DNS provider. Some DNS hostnames are given below
| DNS provider | Host Name |
| Google Public DNS | dns.google |
| Cloudflare | 1.1.1.1.cloudflare-dns.com |
Once you save the settings you can use the DNS service.
Setting DNS for Older Android versions.
In older Android versions you will have to follow the below steps. And you should change DNS for each network you use.
- Go to settings then connections.
- Go to wifi settings.
- Now press and hold the wifi connection that you want to change the DNS.
- Go to manage network settings.
- If any setting for DNS is not showing, go to advance settings.
- Now go to where there are two text fields DNS1 and DNS2.
- Now you have to fill in the Ip addresses of the servers you want to use as your DNS; some of the IP addresses are given below.
| DNS provider | DNS1 | DNS2 |
| Google public DNS | 8.8.8.8 | 8.8.4.4 |
| OpenDNS | 208.67.222.222 | 208.67.220.220 |
| Cloudflare | 1.1.1.1 | 1.1.1.1 |
Once you are done, save the settings.
Keep in mind that after these changes, your internet connection might not work. Restart the phone and the wifi router to get the connection back; if it is not working even after restarting, it’s better to undo the changes and keep the default DNS router.
Using an APP to change the DNS
You also can use an android App to change the DNS. There are several apps in the play store for that. However, you need to have a hostname or a DNS1 and DNS2 IP address to change your DNS server.